Contouring has become a fundamental technique in makeup artistry, offering the ability to sculpt, define, and highlight the face. From the red carpet to everyday looks, contouring has revolutionized how we shape our features with cosmetics. While it once seemed like a complicated and intimidating process, the rise of tutorials and makeup products specifically designed for contouring has made it more accessible than ever. In this article, we will explore everything you need to know about makeup contouring, from the basics to advanced techniques.
What is Makeup Contouring?
Contouring is the technique of using makeup to create shadows and highlights on the face, enhancing its natural structure. The goal is to sculpt the face by making certain areas appear more defined or slimmer, while other areas are illuminated for a brighter, more youthful appearance.
The two primary components of contouring are:
- Contouring (Shading): Darker shades of makeup are applied to areas where shadows naturally fall. These areas typically include the hollows of the cheeks, the jawline, the sides of the nose, and the temples. The purpose of this is to create the illusion of depth and structure.
- Highlighting: Lighter shades are applied to areas that catch the light, such as the tops of the cheekbones, the bridge of the nose, the center of the forehead, and the cupid’s bow. This draws attention to these features, giving the face a lifted and glowing appearance.
Tools of the Trade
Before diving into the actual technique, let’s review the essential tools you’ll need for a flawless contour:
- Contouring Products:
- Cream Contour: Ideal for a more natural, dewy finish. Cream contour products are blendable and work well for drier skin types.
- Powder Contour: Great for oilier skin types or those looking for a more matte finish. Powder contour products tend to be easier to work with for beginners.
- Stick Contour: Contour sticks are convenient for precision and easy to apply for quick contouring.
- Highlighting Products: These can come in powder, cream, liquid, or stick form. Highlighters with a subtle shimmer or metallic finish will create the desired brightened effect.
- Brushes and Tools:
- Contour Brush: A dense brush with angled bristles is ideal for applying contour products in the hollows of the face.
- Blending Sponge: A beauty sponge is essential for blending contour products seamlessly into the skin.
- Fan Brush: Perfect for applying highlighter to the high points of the face.
- Precision Brushes: Small, dense brushes are great for precise contouring along the nose or under the chin.
- Setting Powder: Once your contour and highlight are blended, setting powder is essential to lock everything in place and avoid smudging throughout the day.
Step-by-Step Guide to Contouring
Contouring is a versatile technique, and the specific steps can vary based on your face shape and desired outcome. However, there are general steps that can be applied to most faces:
Step 1: Prep Your Skin
The key to a long-lasting and seamless contour is a smooth base. Begin with your regular skincare routine, ensuring your face is well-moisturized. Apply a primer to create an even canvas and ensure your makeup stays in place. Follow up with your foundation, choosing a shade that matches your skin tone, and blend well.
Step 2: Apply Concealer
Concealer is typically used to brighten areas you want to highlight. Apply a shade or two lighter than your skin tone under your eyes, on your forehead, the bridge of your nose, and on your chin. Blend the concealer out, making sure it’s smooth and even.
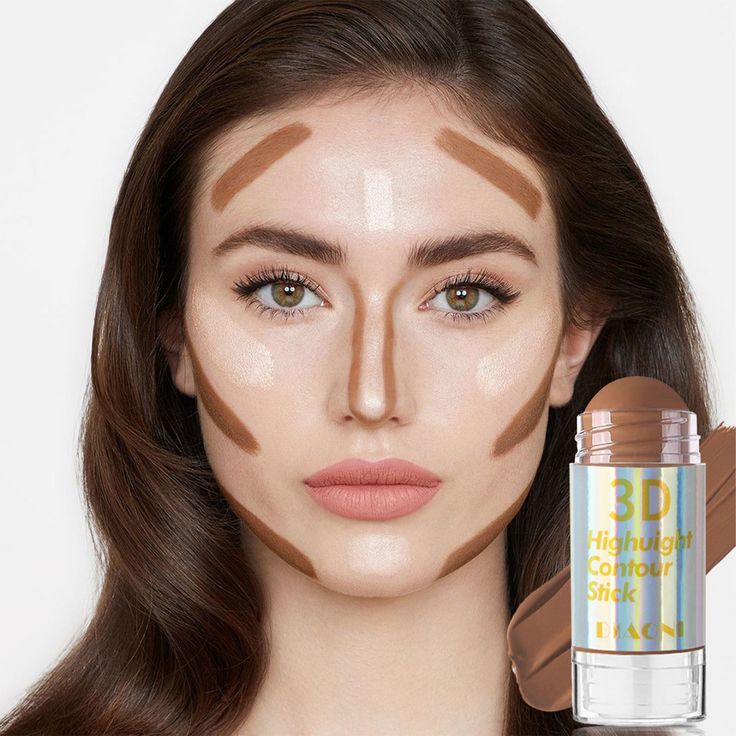
Step 3: Contouring (Shading)
Now that your base is set, it’s time to contour. Using a contour product a few shades darker than your skin tone, apply it to the following areas:
- Cheekbones: Create a contour line along the hollows of your cheeks, just below your cheekbone. Suck in your cheeks to find the right spot. Blend the contour product back toward your hairline for a lifted effect.
- Jawline: Apply contour along your jawline to define the area and create a sharper appearance.
- Temples: Lightly contour the sides of your forehead near your temples. This will give the face a more sculpted appearance, especially for round faces.
- Nose: For a slimmer nose, apply contour along the sides of the nose. You can also contour the sides of the nostrils for added definition.
Once you’ve applied the contour, blend it well using a makeup sponge or a contour brush. Blend upward for a lifted look and avoid harsh lines that could appear unnatural.
Step 4: Highlighting
The next step is highlighting, which will give your face a radiant, lifted look. Apply highlighter to the following areas:
- Under the eyes: The area where you applied concealer can be brightened with a slightly more reflective highlighter to create a glowing under-eye.
- Cheekbones: The tops of your cheekbones are the perfect place for a bright highlight, adding dimension to the face.
- Center of the forehead: A subtle highlighter on the forehead will draw attention to the center of the face and add brightness.
- Bridge of the nose: Lightly apply highlighter down the bridge of your nose to bring attention to this area.
- Cupid’s Bow and Chin: A little highlighter on the chin and above the lip can create the illusion of fuller lips and a balanced look.
Step 5: Blend, Blend, Blend
This step is crucial. Blending ensures that your contour and highlight appear natural and seamless. Take a clean blending sponge or brush and gently blend the products into your skin, making sure there are no harsh lines. The goal is to make the contour and highlight look as natural as possible.
Step 6: Set Your Makeup
To prevent your contour and highlight from moving or fading, set your makeup with a translucent setting powder. Apply a light layer of setting powder to areas where you’ve highlighted to ensure it stays in place. If you have oily skin, you may want to lightly set your contour as well.
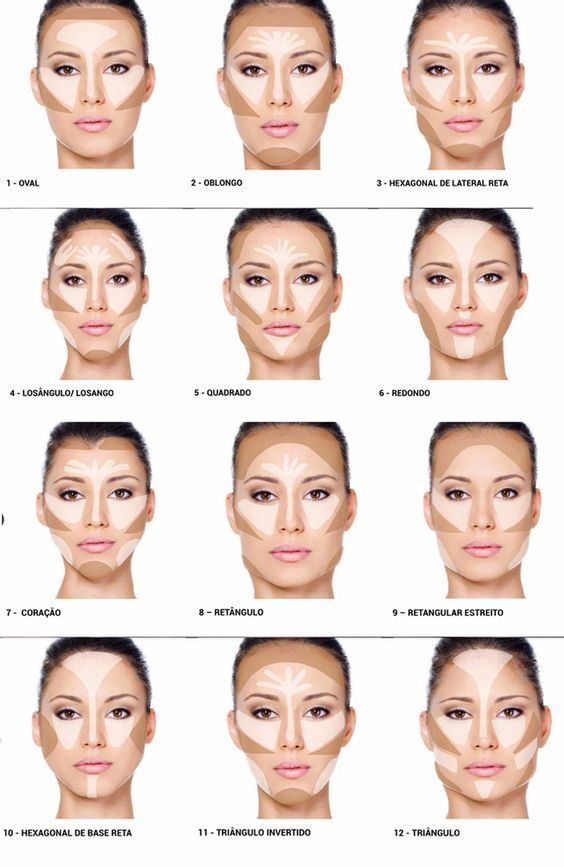
Contouring for Different Face Shapes
Not everyone’s face shape is the same, so understanding how to contour for your specific face shape can make all the difference. Here’s a guide to contouring for different face shapes:
- Round Face: Contour the sides of the face to create more definition and elongate the face. Highlight the center of the face to draw attention to the middle and balance out the roundness.
- Oval Face: With an oval face shape, you’ll want to contour around the temples and jawline to add structure, while highlighting the cheekbones and forehead to add dimension.
- Square Face: Contour along the edges of the forehead, jawline, and cheekbones to soften the strong angles of the face. Highlight the center of the face to create balance.
- Heart-Shaped Face: To balance a wider forehead, contour the temples and the sides of the forehead. Highlight the chin and cheekbones to create a more oval-like appearance.
- Long Face: Contour the forehead and jawline to shorten the face. Highlighting the center of the forehead and chin helps break up the long lines.
Contouring Mistakes to Avoid
- Using the Wrong Shades: When choosing your contour products, be mindful of undertones. Cool-toned contour shades are best for fair skin, while warmer tones work better for medium to dark skin tones.
- Not Blending Enough: Blending is key to a natural contour. Avoid sharp, noticeable lines by thoroughly blending your products into your skin.
- Too Much Product: A little goes a long way when it comes to contouring. Applying too much product can make the contour look heavy or unnatural.
- Not Setting Makeup Properly: If you skip the setting powder, your contour and highlight may fade throughout the day. Make sure to set your makeup for lasting results.
Conclusion
Contouring can be an excellent way to enhance your features and add depth to your face with just a few simple products. Whether you are looking for a subtle everyday contour or a bold sculpted look, mastering this technique can elevate your makeup game. By understanding the basics, using the right tools, and practicing, you’ll be able to contour with confidence, no matter your face shape or makeup preferences.